2010年6月9日 星期三

Installing and using mono on Ubuntu

英文來源

Two of the most popular topics on Builder AU, and indeed in the wider industry, is Microsoft's .NET framework and Linux development and administration.

Most of the time the two are in conflict, and it's rare to find a developer who needs to know about both. A lot of people aren't aware that you can combine the two, however, by using the Open Source mono project. This article will get you started on installing mono and running basic .NET applications on Linux

Firstly you'll need to install the base mono package using apt-get. It is a good idea to install two other packages at this point: monodevelop -- an interactive mono development environment similar in some ways to Visual Studio .NET (although nowhere near as sophisticated), and monodoc which provides help and technical documentation.

Just start up a root terminal and type:

% apt-get install mono monodevelop monodoc


When that's finished you've got a mono implementation ready to go, but while you're at it, you may as well include some of the add ons you'll need.

% apt-get install mono-utils mono-xsp monodoc-http

mono-utils provides some command line utilities that are useful if you'll be doing part of your development from the terminal. monodoc-http provides the monodoc manuals as a Web service, which requires the mono-xsp standalone Web server to operate. mono contains mcs the mono C# compiler, but it only compiles .NET 1.1 code, if you want to use the features of .NET 2.0 C# (such as the extremely helpful generics) then you'll need gmcs:

% apt-get install mono-gmcs

If you're planning to use monodevelop to write your code, then you can install a few more packages for SVN, Java, NUnit, Boo and MonoQuery support:

% apt-get install monodevelop-versioncontrol monodevelop-java monodevelop-nunit monodevelop-boo monodevelop-query

Likewise, if you're planning to use monodoc (strongly recommended) you can install manuals for whichever toolkits you'll be using:

% apt-get install monodoc-nunit-manual monodoc-ipod-manual monodoc-gtk2.0-manual


Before we get started on the code, let's take a look at some of the tools we've just installed. The monodoc browser lets you view the mono related manuals you have installed, including the useful C# language specification reference.


Or, if you'd prefer, you can read the documentation in your Web browser. The monodoc-http program starts up an XSP server that runs locally, allowing you to connect to it in any Web browser:
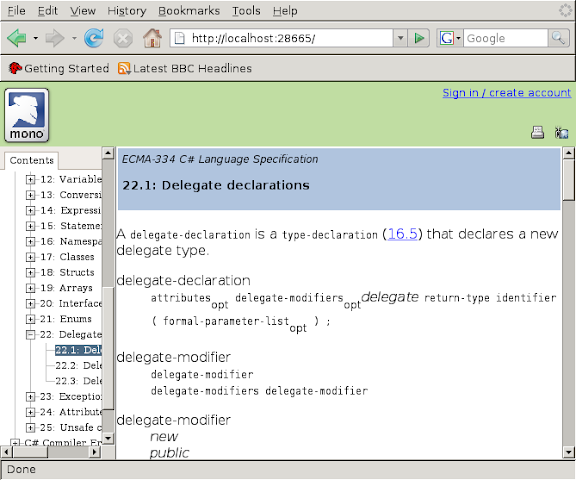


You can also start up the monodevelop IDE now if you wish, although you won't need anything that powerful for the examples we'll be looking at.


Now let's check that the whole thing is working by trying out some code. Take the standard C# Hello World program:

using System;
namespace Hello {
 class HelloWorld {
  public static void Main(string[] args) {
   Console.WriteLine("Hello World!");
  }
 }
}

Compile it using mcs and run it with the command mono. And the result:


That works, but it's a completely trivial example, and it doesn't include the most used part of .NET: Windows Forms. Let's see if a simple Windows Forms application will work. First make sure that you've got the relevant libraries installed:

% apt-get install libmono-winforms1.0-cil libmono-winforms2.0-cil

Now the source code:

using System;
using System.Windows.Forms;

namespace HelloClickWorld {
 public class Hello : Form {
  public static void Main (string[] args) {
   Application.Run (new Hello ());
  }

  public Hello ()
  {
   Button button = new Button ();
   button.Text = "Click...";
   button.Click += new EventHandler (Button_Click);
   Controls.Add (button);
  }

  private void Button_Click (object sender, EventArgs e)
  {
   MessageBox.Show ("Hello Click World!");
  }
 }
}

Compiling to assembly this time is a little more complicated, since you need to tell the C# compiler to include the library for Windows Forms:

% mcs -r:System.Windows.Forms hiclickworld.cs
% mono hiclickworld.exe


Finally we need to make sure ASP.NET will work just as well. Save the following as index.aspx:


Then start an xsp server in that directory.


Finally, point your Web browser at http://localhost:8080/ and check out your brand new Linux-built ASP.NET site:
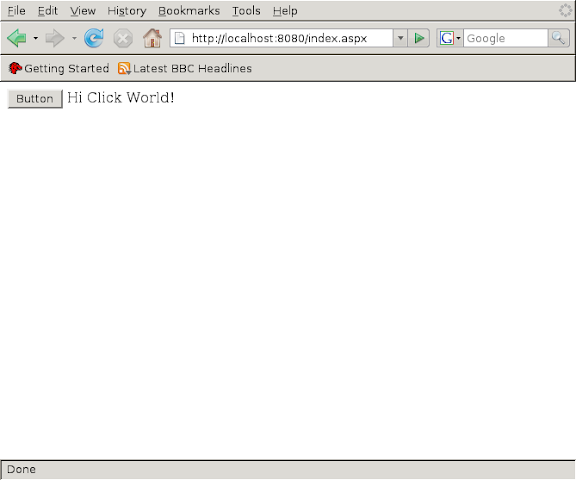


If everything is working so far you've got a completely functioning mono installation, and you should be able to build applications on either Linux or Windows and deploy them on either system.

Be warned, mono is not a perfect replacement, there are parts of the .NET framework currently not implemented, particularly in the area of Windows Forms, so be very careful if you're looking to implement something complicated in mono, or migrate an existing .NET project.

在Ubuntu上執行.Net開發的程式

http://blog.colorbase.tw/programming/516

今天看了 Installing and using mono on Ubuntu 這篇文章之後,測試了一下在Ubuntu中執行.Net的程式

該篇文章對Mono on Ubuntu 講的非常詳細,其中包括如何在Ubuntu中透過mono附帶的編譯器,編譯.Net程式

讓Ubuntu支援.Net WindowForms程式

該文作者是在Ubuntu底下,利用Mono的編譯器進行編譯,因此裝了許多的套件,但如果開發環境是在WIndows底下,而且覺得用命令列編譯 太麻煩,其實只要安裝mono、libmono-winforms1.0-cil、libmono-winforms2.0-cil三個套件,就可以直接 執行已經在Windows底下編譯好的.Net程式,因為在Windows有更好用的 MS Visual Studio跟SharpDevelop等RAD工具,確實可以省下很多麻煩。

Ubuntu中Mono的安裝指令為:

sudo apt-get install mono
sudo apt-get install libmono-winforms1.0-cil libmono-winforms2.0-cil

又或者使用Ubuntu的Synaptic套件管理程式來安裝更方便(用慣GUI介面的人 XD)

小小測試

我在SharpDevelop中使用C#寫了一些簡單的小東西來做測試,GUI的部份只使用最基本的WindowForms元件,編譯完成後,直接拿到Ubuntu底下,輸入:

mono 執行檔名.exe

該測試程式中使用了以下的.Net套件

  • System
  • System.Collections.Generic
  • System.Drawing
  • System.Windows.Forms
  • System.Net
  • System.Threading
  • System.Collections
  • System.Xml
  • System.IO
  • System.Text

執行結果,各個功能執行無誤,執行畫面如下:

如同該篇文章所說,Mono並無支援所有的WindowForms元件,後來又測試了使用ToolTip元件,發現無法執行,原因似乎是不支援氣泡提示。

結論

雖然很遺憾Mono仍尚未完全支援.Net所提供的套件,但是以目前支援的程度所能達到的應用,應該可以說數不完了。

Ubuntu Server 的設定路徑

http://ubuntufish.blogspot.com/2008/04/ubuntu-server.html

Ubuntu Apache設定檔(http.conf)位置:
/etc/apache2/httpd.conf
/etc/apache2/apache2.conf
設定網頁位置、網址等基本
/etc/apache2/sites-available/default
加入 rewrite mode
/etc/apache2/mods-enabled$ sudo ln -s ../mods-available/rewrite.load rewrite.load
網頁預設目錄:/var/www

Ubuntu MySQL設定檔(my.cnf)位置:
/etc/mysql/my.cnf
資料庫預設目錄:/var/lib/mysql

Ubuntu PHP設定檔(php.ini)位置:
/etc/php5/apache2/php.ini

清單 - Skills for Linux

編輯


◆ Scientific Linux

 ‧google chrome在linux下不能用root開啟之解決方案


◆ CentOS

 ▲ How To

 ▲ 執行Windows 程式:直接安裝Wine。語法:yum install wine


◆ Ubuntu

 ▲ How To
  ‧2010/08/18 Ubuntu 10.04怎麼使用?

 ▲ Parameters Setup
  ‧2010/04/26 Ubuntu Server 的設定路徑


 ▲ Trouble Shooting
  ‧2010/05/06 Ubuntu 安裝新軟體之簽章問題

 ▲ 執行Windows 程式
  ‧2008/12/12 在Ubuntu上執行.Net開發的程式
  ‧2007/07/05 installing and using mono on Ubuntu

.

Ubuntu 安裝新軟體之簽章問題

http://ubuntufish.blogspot.com/search/label/Ubuntu

ubuntu在更新或加入新軟體時,時而出現
==============================================================
W: GPG error: http://ppa.launchpad.net jaunty Release: 由於無法
取得它們的公鑰,以下簽章無法進行驗證: NO_PUBKE 6AF0E1940624A220
===============================================================


解決方式:
===============================================================
sudo apt-key adv --recv-keys --keyserver keyserver.ubuntu.com 6AF0E1940624A220
===============================================================

紅色字代表公鑰,每一軟體的公鑰不同,依每次出現公鑰取代之.

dpi, ppi之差別

http://www.wretch.cc/blog/ayu6628/22104828

解析度設多少dpi?這是大家慣用於影像品質設定的溝通單位。

會用photoshop的都知道,就把影像尺寸的解析度改成規定的數字就可以了,而對於什麼是dpi或是品質概念,我想很多人都還是一知半解。

我們所說的解析度是指Resolution(圖像解析度),而dpi就是它的計算單位,事實上,在數位影像的內容裡的單位是像素,所以"數位解析度"的正確單位說法應該是ppi,我們由字面來翻譯就知道兩者的不同,dpi - dots per inch (每一英吋的點數量),ppi - pixel per inch (每一英吋的像素量),而啥麼是像素?有興趣可先參閱"什麼是像素、畫素、圖素"。

例如,我們開啟新檔,設定一英吋有10個像素。


如圖示,檔案開啟後,一英吋是10x10個像素,因為面積是以平方計算,所以總共就是100個像素。


那dpi - dots per inch (每一英吋的點數量),倒底是什麼?dpi正確來說是印表機或噴墨型輸出機的解析度單位,例如1200dpi的解析度,就是指每一英吋能列印1200個點數量,也可稱為"設備解析度"。


我們設定一英吋有10像素,使用1000dpi的設備噴印,ppi的1畫素就等於1格,雖然設備的墨點可以噴印高解析,卻因為像素的不足,100萬個點被塞在一平方英吋內,而每個畫素大約容納1000個點,因此畫面就會出現格狀,這就是典型數位檔案ppi不足,造成設備解析度差的情況。


反之,我們設定一英吋裡有1000像素,等於一平方英吋有100萬個畫素,影像就會非常的銳利,但是使用100dpi的設備噴印,雖然數位影像解析度夠了,但是因為設備的解析度的不足,在一英吋裡的100萬個畫素卻只能噴印出10000個點,平均100個畫素只能只用一個墨點,所以就算ppi再高也因為設備dpi受限而無法呈現出最佳解析度。

探討如何與 kernel 的發展同步

http://www.jollen.org/blog/2006/11/reading_kernel_kernel_patch.html

從事 Embedded Linux(GNU/Linux systems on devices)工作的朋友,除了日常的讀書功課外,另外一個重要的工作就是「隨時注意 Linux kernel 的發展狀況」。要能與 Linux kernel 的發展同步,嚴格來說,已經是一件吃重的工作了,不過還是可以列出幾個基本的工作原則如下:

1. 每天閱讀 linux-kernel 郵遞論壇(mailing-list)的「標題」。

2. 隨時上 kernel.org 看看最新釋出的 kernel 版本(或留意 linux-kernel-announce mailing-list)。

3. 閱讀釋出版本的 Changelog。

4. 不要與 git 系統的距離太遠,定時看看 git 系統,保持一定的「短距離」。

Mailing List

linux-kernel 上的 posts 每天的量大約在 200~350 篇左右,數量並不算少,要把每一篇都看過是不太可能的,因此以我自己的閱讀心態來說,我會建議以下的閱讀方式:

1. 看標題,如果是自己有興趣或正在留意的更新,我就會標記下來持續追蹤。

2. 如果有 Bugfix 的 patch 出現,我會看看這項修正的起因與原理,但為了不讓自己花費太多時間,如果我對這項 patch 的修正「原理」不甚熟悉,我便會跳過此 post。

以下是閱讀 linux-kernel list 必須知道的幾件事:

1. 如果有新的修正,第一時間都會發佈在此 list 上,並且標題的起頭一定是 "[PATCH n/m] subject" 這樣的格式。PATCH 表示這是一個 patch 的發佈,由於一個 patch 會以多篇 post 發佈,因此就用「n/m」來表示「這是第幾篇 patch,總共有幾篇。」,例如:

[PATCH 0/7] KVM: Kernel-based Virtual Machine
[PATCH 1/7] KVM: userspace interface
[PATCH 2/7] KVM: Intel virtual mode extensions definitions
[PATCH 3/7] KVM: kvm data structures
[PATCH 5/7] KVM: mmu virtualization
[PATCH 6/7] KVM: x86 emulator
[PATCH 7/7] KVM: plumbing

2. 不能在這裡詢問與 kernel 發展無關的問題,例如:工具的使用、系統設定、詢問是否有XXX驅動程式、請求協助測試等等,這些都是不能張貼的文章。另外,原本就該留意的非成文禮節一定要注意,像是 FAQ 能找到的東西,就不要去麻煩人家。

3. list 裡大部份都是 device driver 的討論,並且很多都是架構面或觀念面的討論與修正建議,所以當您參與討論時,千萬不要用「個人的主觀看法,或是沒有事實與理論根據」的角度發表意見;由於「觀念」的修正是 kernel 2.6 驅動程式的大討論方向,所以必須先把主題相關的東西先看懂看熟後再參與討論。

kernel.org

我會不定時來看看最新發佈的 kernel 版本,因此我們必須知道目前仍在維護的 kernel 版本與其分支狀況,大致說明如下:

1. 2.6 與 2.4 都是目前仍持續積極維護中的版本。以本文寫作的時間為例(2006/11/20),目前最新的版本分別是 2.6.18.3(2006/11/19 釋出)與 2.4.33.4(2006/11/19 釋出)。

2. 2.4 的釋出版本有「stable」與「prepatch」二個分支。

3. 2.6 的釋出版本有「stable」、「prepatch」、「snapshot」與「-mm patch」四個分支。

其中 '-mm' 系列的 2.6 kernel 是由 Andrew Morton 所釋出的 Linux 分支,主要性質以「實驗」與「新功能」為主 ,所以常常可以在這個分支的 kernel 裡找到不久前才剛發佈在 mailing-list 上的 patch。如果您不太知道怎麼處理 mailing-list 上的 patch 發佈,也可以等 -mm patch 的發佈。

另外,prepatch 就是所謂的 '-rc' 發佈,所以檔名會接 '-rc?' 字串,例如:linux-2.6.19-rc6。

Changlog

每個在 kernel.org 上所釋出的 kernel 都會有一份變更紀錄(change logs)的檔案,可以了解這個版本與分支的釋出做了什麼變更。

上到 kernel.org 後,每個釋出版本的後面,會有 4 個選項(視版本不同):

  • F = full source
  • V = view patch
  • VI = view incremental
  • C = current changesets

把「C」給按下去就會進到所謂的「git 系統」。

git 系統

git 是 kernel 用來維護發展中版本的系統,也就是所謂的「snapshot 」版本,snapshot 版本都是當天新鮮送達的 kernel,釋出時會在後面加上「-git?」字串。

我會不定時點「C」到 kernel 的 git 去看看 kernel 的最新(最近)動態,說不定有我正要找的 patch。git 系統裡也能看到 kernel 的 "commit" 訊息,包含 commit 的作者、時間與差異比較(diff),而且都可以很方便地瀏覽。

結語

隨時與 kernel 的發展同步,有幾個動機:

1. 學習,kernel developers 會討論與多觀念面的議題,很好的學習機會。

2. 新的 kernel 加入了哪些新驅動程式、修正掉哪些臭蟲與增強了哪些驅動程式的功能?

3. 留意我所使用的平臺(architecture)是否有重要的修正(eg. for i386, for ARM...etc)。

4. 如果新 kernel 有加入重要的 feature 或 Bugfix,我會把自己玩耍的 code patch 到新 kernel。

測試這些有趣的新版本,建議使用 QEMU 或是 User-Mode Linux 來進行。

文章清單 - OS, Kernel, Fileformat

編輯


◆ OS Kernel

 ・2007/04/01 深入探索 Windows Vista 核心:第三篇
 ・2007/03/01 深入探索 Windows Vista 核心:第二篇
 ・2007/02/01 深入探索 Windows Vista 核心:第一篇
 ・2006/11/20 探討如何與 kernel 的發展同步


◆ OS Developer  ・OS Development Tutorials
 ・OS Development Papers


◆ Linux Only

 ・System Calls #1:(第20號系統服務) sys_getpid
 ・System Calls #2:(第199,200,201,202,224號系統服務) sys_getuid, sys_geteuid, sys_getgid, sys_getegid, sys_gettid
 ・System Calls #3:(第64號系統服務) sys_getppid
 ・System Calls #4:(第34號系統服務) sys_nice
 ・System Calls #5:(第96號系統服務) sys_getpriority
 ・System Calls #6:(第97號系統服務) sys_setpriority
 ・System Calls #7:(第157號系統服務) sys_sched_getscheduler
 ・Linux 核心分享包, #1: 《開工篇》
 ・Linux 核心分享包, #2: 《講義1~5》
 ・Linux 核心分享包, #3: fork_init(...)《講義6》


◆ Executable File Format

 ・ELF格式, #1: ELF 簡介
 ・ELF格式, #2: ELF header 與範例規劃
 ・ELF格式, #3: 第一個範例:loader v0.1(讀 ELF 檔頭)
 ・ELF格式, #4: 第一個範例:loader v0.2(ELF Identification)
 ・ELF格式, #5: 讀 ELF Section(說明)
 ・ELF格式, #6: 讀 ELF Section(程式列表)
 ・ELF格式, #7: 讀 ELF 的 Section Name(透過 strtab)
 ・ELF格式, #8: loader v0.5 與結果輸出(改善與小討論)
 ・ELF格式, #8: loader v0.5 與結果輸出

 ・ELF 之 Dynamic Linking, #1: 前言與簡介
 ・ELF 之 Dynamic Linking, #2: DT_NEEDED 基本概念
 ・ELF Program Loading, #1: Segment 的觀念
 ・ELF Program Loading, #2: Program Header Table
 ・ELF Program Loading, #3: Segment Type 與 Kernel Space Loader
 ・ELF Program Loading, #4: Program Loader 整體流程
 ・BSS Section 觀念教學


清單 - HDD and Storage

編輯

◆ 硬碟

 ‧2010/03/11 硬碟新格式恐與XP不合
 ‧2010/02/15 即將出現大小如郵票般的 1 TB SSD
 ‧2006/03/25 硬碟組織宣佈新磁區長度標準


 *報導:Seagate 將在2007年底停產 IDE


◆ 儲存技術

 ‧2010/06/24 世上第一款量 子記憶儲存裝置
 ‧2007/07/07 讓碟片容量超過 500GB 的微型全像術
 ‧2007/01/19 單一光子的超高密度光學儲存

 * Turner Entertainment 採用全像儲存技術
 * 研究者找到快速清除硬碟資料的方法
 * 儲存管理標準再進一步

.